torrent fies

torrent fies
torrent fies

Tuesday, November 30, 2010

3ds max from scratch lesson_06

Max for all presents 3ds max from scratch at http://maxtutrs.blogspot.com/

Now if  we have an object and in the scene and we want a similar copy of it how could we do that ?
Let’s open this simple max file called ( clone.max ) which has 3 different boxes.


to clone an object it’s very simple, just drag it while holding down the shift key.

Let’s do that with the first box.
Once you left the mouse a popup menu appears called ( clone options ).


It allows you to choose the type of cloning ( copy – instance – reference ).
Also allows you to type the number of copies.
And to type the name of the clone object.

To know the difference between the cloning types do what I do.

For the first box choose copy and type three (3) in the number of copies.


For the second box choose instance and type three (3) in the number of copies.


For the third box choose reference and type three (3) in the number of copies.


from the first look it seems like there’s no different between the three types.

Let’s figure out the differences.

If we choose a box from the copy type we’ll see that in the modify panel the name of the box and it’s parameters.


If we choose a box from the instance type we’ll see that in the modify panel the name of the box ( written in Bold ) and it’s parameters.
When you see a bold name in the modify panel that means there’s a link between this object and another object in the scene.


If we choose the first box from the reference type we’ll see that in the modify panel the name of the box ( written in Bold ) and it’s parameters.
The same when you see a bold name in the modify panel that means there’s a link between this object and another object in the scene.


now let’s figure out the differences between these types.

Choose any box from the copy type, then go to parameters and let’s change any parameter, let’s increase the height for example.


as we can see the changes are influence the selected object.

Let’s add a modifier to the selected object from the modifier list
.
Open the list and press B to choose the bend modifier.


Then change the angle to 90.


adding a modifier influence only the selected object.

Let’s go for the second type of cloning, the instance type.

From the second row, the instance boxes, choose any box and change any of its parameters.
Let’s increase it’s height.


once you change its height the other boxes height change with the same value.

What about adding a modifier to the object.
Let’s add the bend modifier and make the angle 90 as the last example.


all the boxes are influenced with the modifier, so if you select any other box you’ll find a bend modifier added to it.


let’s go to the last type, reference type.
Why I asked you to select the first box when exploring the way its name written, because in the reference type the other objects have also a dark gray line above its name.


we’ll figure out what this line do.
Choose one of the cloned boxes and make its name and not the gray line selected.


then change any of its parameters, increase the height.


Just like the instance type the reference type influence the other boxes.

While we selecting the box name – not the gray line – let’s add the bend modifier and make the angle 90.


also adding the modifiers influence the other objects.

So what’s the difference between the instance and the reference types?

To know that let’s first delete the bend modifier we have added.
To do that while the bend modifier selected go to this button which called remove the modifier from the stack and click it.


then select the dark gray line.


then add the bend modifier and make the angle 90.


the modifier doesn’t influence the other boxes any more, so it’s like the copy type.

It means that every changes under the gray line influence the other cloned objects ( just like the instance type ) and every changes above the gray line doesn’t influence the other cloned objects ( just like the copy type ).

In all the three cloning types the transformations doesn’t influence the other objects.

So if we tried to move, rotate or scale the object it only happens to the selected object whatever the type of the clone.

If you want to take one of the cloned objects in instance or reference type and you want to change it separately just click on this small button which called make unique


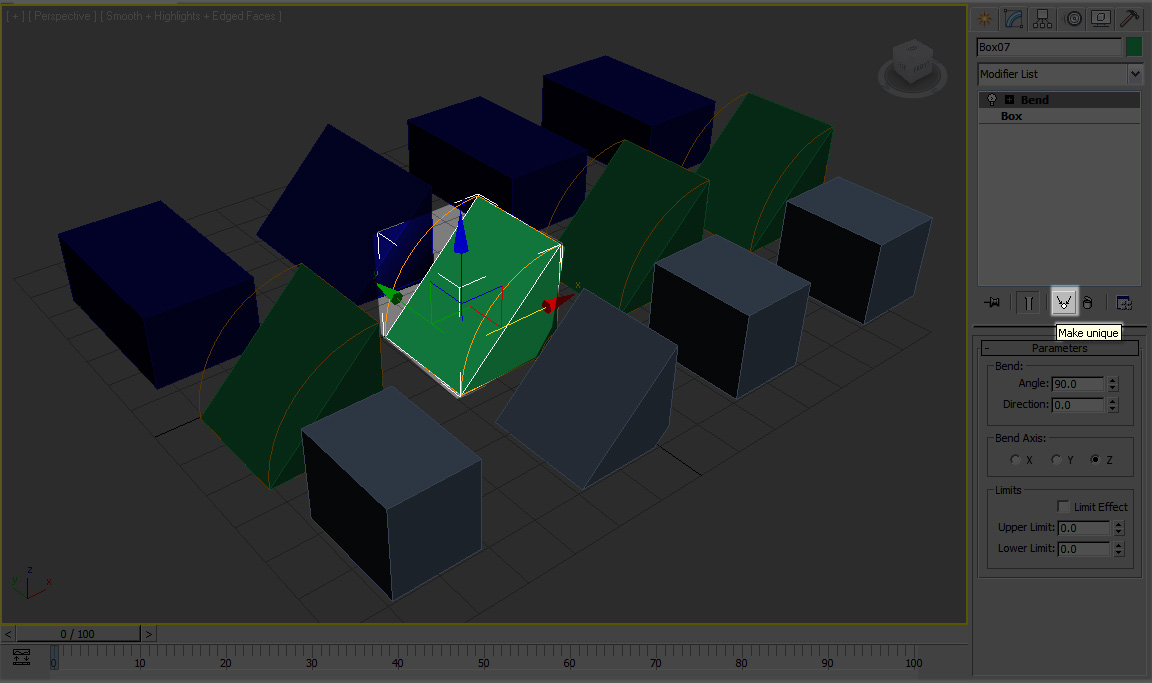
once you do that the bold name becomes regular and you can change any thing for this object alone.


Summary:

Cloning with a copy type:
- Regular font name.
- Changing parameters don’t inherit to other cloned objects.
- Adding modifiers don’t inherit to other cloned objects.

Cloning with an instance type:
- Bold font name.
- Changing parameters inherited to other cloned objects.
- Adding modifiers inherited to other cloned objects.

Cloning with a reference type:
- Bold font name for the original object.
- Bold font name and dark gray line above it in the cloned objects.
- Changing parameters inherited to other cloned objects.
- Adding modifiers under the dark gray line inherited to other cloned objects.
- Adding modifiers above the dark gray line don’t inherit to other cloned objects.

Download project files from HERE

3ds max from scratch lesson_05


Max for all presents
3ds max from scratch series at http://maxtutrs.blogspot.com/

Now we know how to use the numeric boxes in transforming objects, but what if the object ( the chair for example ) is ( -175.963 ) on ( x ) and
(-255.308 ) on ( y ) and (94.069 ) on ( z ) and we want to move it ( 225 ) unit on X and ( -120 ) on y and ( 100 ) on z.

There’re two ways to do that :-
-         bring a math teacher.
-         Or click on this small button which called absolute mode transform type-in.


once you click on this button the axis numbers will become ( 0 ) which means that where ever the object the axis will stay ( 0 ) so you can type the number you want the object to move without calculations.

So If you want to move the object ( the chair in this example ) ( 225 ) units on X and ( -120 ) on y and ( 100 ) on z, just type these numbers in the numeric boxes.


When we move the object we move it on the existing axis but when we choose another object and its directions are different we found the axis still pointing to the same directions of the other object.

So why is that? And what if I want to move the object to its right or up or back?

If you look beside the scale tool you’ll find a list called reference coordinate system.


the default of this list is ( view ) and this explains why the axis are looks for one direction, that because the reference coordinate is the view.

This answers the first question and let’s understand it clearly.
I create a box and as we see it’s axis are pointing for the view directions.


let’s rotate it a little bit and select the move tool again.


as we see the axis still pointing as it was.
So what if we want to move it at it’s right or left, to it’s up or down, to it’s forward and backward?
In this case the ( view ) coordinate system doesn’t work, but if you choose local from the list look how the axis direction changes.


these two are the most important but I’ll explain the others also.

Screen : takes the screen its coordinate system reference.


these two are the most important but I’ll explain the others also.

Screen : takes the screen its coordinate system reference.


Grid : the reference her is the grid.
Pick : allows you to pick an object by clicking on it and it becomes the reference without any linking like in parent.


Now after knowing the most thing of transforming ( moving, rotating and scaling ) object, how can do that very accurate.

SNAPING :-

To go with me step by step open the max file ( primitives.max ) which included in the project files.
It’s a simple file, it has two spheres and one box.


Let’s maximize the top view and select the small sphere.


these three buttons are for snapping the objects.


the first one ( snap toggle ) is for the move.
As you can see when we try to move the sphere while snapping is active it snaps to the grid points.
It’s hotkey is S.


but if you want to snap to something else ( another object for example ) go to the snap button and right click.


It allows you to select what you want to snap to so select vertex and deselect grid point, and now it’s no longer snaps to the grid point and it’ll snap to the vertex.


the second snap button is angle snap toggle and from the name it’s clear that it’s for the rotate tool.
It’s hotkey is A.

When it’s active when you rotate the object it snaps for the 5 degree.


to snap for another degree just right click on the angle snap toggle.


you can change the angle to the degree you want.

the third snap button is percent snap toggle and it’s for the scale tool.

When it’s active once you try to scale the object it snaps for the 10 percent.


to snap for another percent just right click on the percent snap toggle.


you can change the percent to the degree you want.

Download the project files from HERE
 

Sunday, November 28, 2010

3ds max from scratch lesson_04

Max for all presents
3ds max from scratch series at http://maxtutrs.blogspot.com/

As we learned how to select an object let’s know how to manipulate and transform the object.

All what we have to do is ether select and move, select and rotate or select and scale.

These three actions are located just beside the selecting tools on the tool menu.


First of all let’s know how to move an object.

Click on the select and move tool 
 or press the hotkey W and then click on the chair, and once we highlighted the chair notice that we have a three colored axis called Gizmo that allows us to move the object along a various directions.


the three axis are the (X), (Y) and (Z) and the color of every one of them changes to yellow once the mouse come over it.
If you click on the (X) and drag the chair will move on (X).
If you click on the (Z) and drag the chair will move up and down.
If you click on the (Z) and drag the chair will move back and forward.
You can move the object on two axis at the same time if you click on the square between the two axis.


Now let’s know how to rotate an object.
Choose the rotate tool 
 or press the hotkey E and then select the chair and it brings another type of gizmo which is a three circles.


the three circles are the (X), (Y) and (Z) and the color of every one of them changes to yellow once the mouse come over it.
As the move tool the rotate tool allows you to rotate the object on the three axis.
Now let’s know how to scale an object.
Choose the scale tool 
 or press the hotkey R and then select the chair.
Scaling is very similar to both moving and rotating.
Scaling tool allows us to scale the object in any axis so you can scale it on (X), (Y) or (Z), and you can scale it in both axis at once by highlighting and selecting the yellow space between the two axis.


and you can scale the object on all three axis by clicking the very middle area.


If you click and hold on the scale tool you’ll see three types of scaling tool.


the first and default one is select and uniform scale 
 which we explained  before.


The second one is select and non-uniform scale 
this one allows us to scale on any axis but doesn’t allow us to scale on two axis and if you try it scales for all axis together.


The last one is select and squash
with this one if you scale up at one axis the object will scale down at other both axis so it’s squash so it’s useful in animating a cartoon.


another way to scale is to use the three numeric boxes at the bottom of the screen.


as you see I scale the chair to a very different values, so to bring the object to it’s original scale I’ll type 100 in the three boxes and it brings the object back.


these three boxes enable you to move or rotate the object in a specific numbers you want.

So if you choose the move tool and type in the X box 100 the chair will move on the X axis to the specific location.


let’s stop for a while to answer the question you want to ask.
The question is : what are these numbers I type? And what are these refers to?


as you see in the pic the place of the axis on the grid is 0 for X, 0 for Y and 0 for Z.
So simply when you drag the X for the right way the X number goes positive and when goes for the left gives negative numbers.


The same for the Y and Z axis

And the same for scaling and rotating.

Now let’s explore what these numbers refers to.
3ds max has it’s default unit scale which is
1 unit = 1 Inch
but also 3ds max gives you the ability to choose any unit scale you want to use.
To do that go to customize menu and choose unit setup.


As you see we can choose the metric measure, and under it you can choose if it millimeters, centimeters, meters or kilometers.


Notice : The architectures should choose the unit scale they want to work with before start working on their projects.

Tips :
Important hotkeys

Q : select tool
H : select by name
W : move tool
E : rotate tool
R : scale tool

You can maximize the size of your gizmo by pressing ( + ) and minimize it by pressing ( - ).
You can also hide and show it by pressing ( x ).

Download the project file from HERE